
You’ve visited tousands of web pages, but have you ever wondered how exactly the browser builds the DOM? It turns out this is a quite interesting process. This transformation turns HTML, the basic building block of the web, into something much more dynamic and interactive: the Document Object Model (DOM). This article describes the process in slightly simplified way.
The entire parsing process has its own specification. As you might expect, the specification is a lengthy document full of very fine details. I’ll attempt to boil it down to four main steps, adding in some cool details found in the specification. Let’s go!
Step 1: Input (or HTML Code Points)
When you open a webpage or write HTML, it’s essentially a string that can be quite long (many pages are 100kB+ of HTML). From a browser’s standpoint, what you’re dealing with is a series of characters.
These characters are technically known as code points. They’re the letters, numbers, and symbols visible in your HTML file. However, from the browser’s perspective, each of these characters corresponds to a number assigned by Unicode, ranging from U+0000 to U+10FFFF, inclusive.
This stream of code points is then redirected to the next major step.
Step 2. Tokenization
This stage begins the process of making sense of each part of the HTML string. The tokenization algorithm is essentially a state machine (excellent for parsing markup!) that examines each character to understand the markup by identifying meaningful units in HTML, known as tokens.
There are several types of tokens, including DOCTYPE, Start Tags, End Tags, Comment Tags, Character and EOF tokens.
Code Example: Here’s a more detailed look at how a simple HTML line is tokenized.
<div id="header">Welcome!</div>
After tokenization:
<div id="header">becomes a Start Tag token.Welcome!is a bunch of character tokens (each character is separate token).</div>is an End Tag token.
Let’s visualize this process:
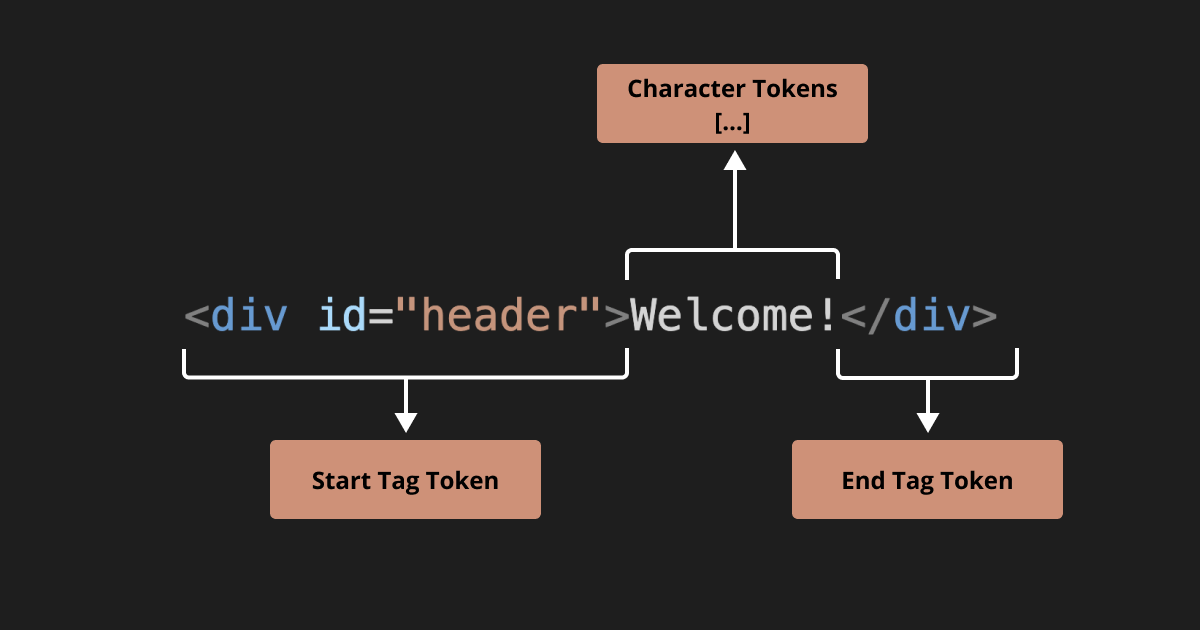
The browser now has distinct, meaningful pieces to work with as it builds the DOM tree.
But there is a twist, after each token is recognized the token is passed to the next stage.
Step 3: Tree Construction
This is where the structure of your web page begins to take shape, and the DOM is constructed. The tree construction algorithm is another state machine. However, instead of processing an input stream, it takes tokens produced by the tokenizer.
The DOM starts with a document at its root, and then elements are added to it according to the tokens passed to the tree construction stage. Besides constructing the DOM tree, this stage also modifies the stack of open elements. It adds an element to the stack when a Start Tag token is provided and removes it when an End Tag token is encountered.
Tree construction behaves differently based on the insertion mode it’s in. The mode changes when major HTML tags, like <html>, <head>, and <body>, are discovered and parsed. Depending on the mode, some HTML tags are treated in a special way.
But let’s look at the example:
<div id="header">
  <p>Welcome to our <b>website!</b></p>
  <p>Enjoy!</p>
</div>
After tokenization, this code would result in a DOM structure like this:
┗ div id="header"
  ┣ p
  ┃ ┣ #text: Welcome to our
  ┃ ┗ b
  ┃   ┗ #text: website!
  ┗ p
    ┗ #text: Enjoy!
This assumes starting from div, in reality
html,headandbodywould be added.
HTML is parsed token by token. That’s why DOM nodes will be created in the same order as the lines in the above output.
As a bonus let’s visualize the insertion modes this code would cause tree construction algorithm to go through:
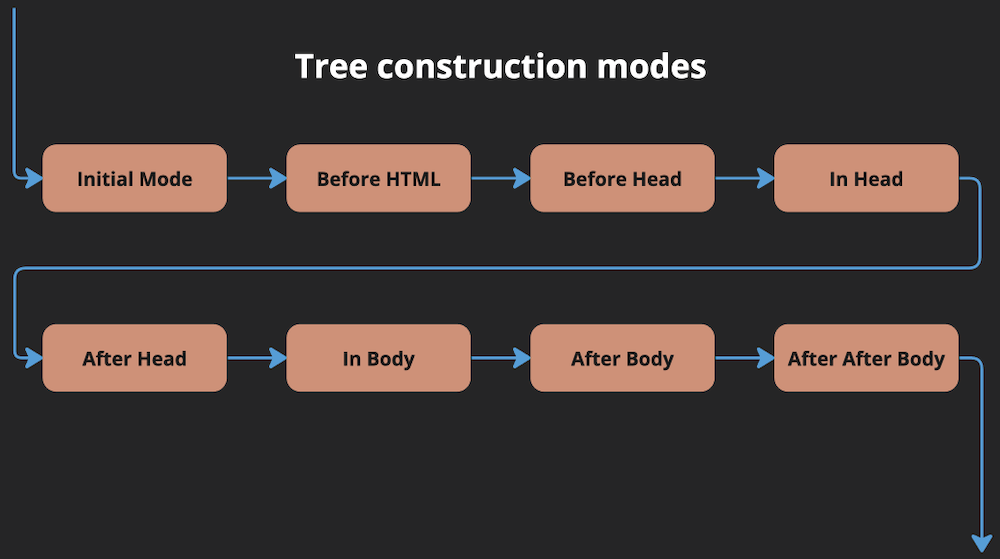
Interestingly there are quite a lot of modes we would not expect - like In Head. HTML parser would add them implicitly even if head section is not present in your HTML. That’s why if you would save the exact HTML in our example and load it in the browser you would get this code in your dev tools:
<html>
  <head></head>
  <body>
    <div id="header">
      <p>Welcome to our <b>website!</b></p>
      <p>Enjoy!</p>
    </div>
  </body>
</html>
Tree is constructed until all tokens are exhausted. Then it’s time for the next step!
Step 4: Error Handling
To be frank, after building the DOM tree, a browser has much to do, such as changing the document state to complete or firing the load event. But when it comes to the DOM and HTML, there’s specifically one more thing: handling errors.
HTML was designed to be extremely fault-tolerant. “Incorrect” HTML syntax has been and still is quite common on the web.
Browsers autocorrect many common mistakes.
That’s why a stack of open elements is important—it allows the browser to auto-close tags. The HTML Standard and HTML parser define a lot of special cases. Thanks to these, many HTML errors don’t affect DOM correctness at all.
Sometimes, a browser is unable to recover from an error, so it may ignore the problematic parts altogether or display them in unexpected ways.
If you are old enough, you might remember seeing PHP stack traces all over the web, displayed when a PHP service failed. Surely such messages were not correct HTML, but browsers managed to display them anyway.
DOM is finished
Now that the DOM is ready, we can use or modify it.
The key takeaway is that HTML parsing was built for resilience. From the use of state machines, where each state and its behavior are crafted to produce output that is as correct as possible, to an elaborate error handling process—it’s all about creating a DOM that is most useful and as close as possible to what the website owner intended, even if it was coded incorrectly.
If you are interested in this kind of stuff I wrote an article on transforming CSS to CSSOM.